Tuesday, 15 November 2016

Network Spoofer for Android - Hack Over WiFi Network & Change Websites

Network Spoofer - THE HACKiNG SAGE
Network Spoofer lets you change websites on other people’s computers who connected to the same WiFi network from an Android phone..
You can use Network Spoofer to :
  • Flip pictures upside down
  • Flip text upside down
  • Make websites experience gravity
  • Redirect websites to other pages
  • Delete random words from websites
  • Replace words on websites with others
  • Change all pictures to Trollface
  • Wobble all pictures / graphics around a bit
  • A few custom modes for you to have your own fun!
It is a very easy app to use if you are looking to prank your friends the app will just run fine if you have rooted your android Mobile.

Requirements to use Network Spoofer :

  • All your friends must be connected to the same WiFi network.
  • Around 500Mb Free Space in your SD Card
  • Rooted Android Phone (Not Rooted Yet ??? Click Here)
  • BusyBox 
  • NetworkSpoofer APK 
Disclaimer – Our tutorials are designed to aid aspiring pen testers/security enthusiasts in learning new skills, we only recommend that you test this tutorial on a system that belongs to YOU. We do not accept responsibility for anyone who thinks it’s a good idea to try to use this to attempt to hack systems that do not belong to you.

How to use Network Spoofer App :

  • Install Network Spoofer in your android Phone using the Above Link.
  • After installation open the App and if the app asks the Root permissions(Super User) grant it.
  • Now Click on the start button on this app.
Network Spoofer - THE HACKiNG SAGE
  • Now There are series of options on what you can do with the app.
Network Spoofer - THE HACKiNG SAGE
  • In this example I have selected to Flip the content of the Screen.
Network Spoofer - THE HACKiNG SAGE
  • Now select all the devices in your Wifi according to the IP address or MAC (Media Access control) Address.
Network Spoofer - THE HACKiNG SAGE
  • Once you are done Select the Start button and that’s it all the content in our friends phone will be flipped just like the screenshot below.
Network Spoofer - THE HACKiNG SAGE

View The Source Code : GitHub


and if you like this post please like & share with your friends...

& Don't Forget To....

Like Our Facebook Page : www.facebook.com/thehackingsage

Join Our Facebook Group : www.facebook.com/groups/thehackingsage

Follow Us at Twitter : www.twitter.com/thehackingsage

Follow Us at Instagram : www.instagram.com/thehackingsage

Subscribe Our You Tube Channel : www.youtube.com/c/THEHACKiNGSAGE4U

Keep Visiting... Enjoy !!! :)

Labels: , , , , , , ,

Sunday, 13 November 2016

Tor For Newbies - How & Why To Use It?

Tor For Newbies - How & Why To Use It? - THE HACKiNG SAGE
Every device that connects to the internet has an Internet Protocol (IP) address – a unique number that identifies it to the servers and websites it communicates with.
If you ever want to hide your IP address (and your location and browsing history with it) in a maze of servers, Tor is a sure bet.
Here’s How To Get Started? :

How Tor Works ?

When you use Tor’s browser, your internet traffic is routed through a number of different volunteer computers around the world (called ‘relays’). This makes it extremely hard for anyone to identify you or your location.

Why You Should Use It ?

Tor is for everyone – even if you have nothing to hide. Benefits include:
  • Privacy
  • Prevents online tracking
  • Protects data from hackers
  • Can circumvent firewalls

How to Get the Tor Bundle ?

Tor comes with a free, pre-configured browser for desktop and mobile devices. You can download and install it in a matter of minutes:
  1. Go to torproject.org and click ‘Download’.
  2. The website will detect what operating system (Windows, Mac or Linux) you use. If correct, click ‘Download Tor Browser Bundle’. Otherwise, follow the link for the correct operating system download.
  3. Double-click on the downloaded file. Choose a location where the file will be extracted.
  4. Click ‘Finish’ to create the ‘Tor Browser’ folder on your computer. You can also put the browser onto a USB flash drive and access Tor on other computers without installing.
  5. Click on Start Tor Browser’ in the Tor Browser folder.
  6. Tor will ask you about your internet connection. If you want to connect to Tor directly, click ‘Connect’.
    However, if you live in a country where the internet is censored or Tor is frowned upon, access the network indirectly or through a ‘bridge’. To do this, click ‘Configure’.
  7. Tor will connect automatically to the relay network. If so, go to Step 8. If Tor does not connect automatically go to step 7.1.
    • You have several options.
    • 7.1.A. Connect via a proxy server, which acts as an intermediary between you and Tor. Use a proxy connection if you want to hide not only your IP address but also the fact you’re using Tor.
    • 7.1.B. Give the details of your chosen proxy and hit ‘Next’.
    • Tip: Use proxy server data from trusted sources such as proxylist.hidemyass.com.
    • 7.1.C. A connection will be made between you, the proxy and the Tor network. You can now launch the browser. Go to Step 8.
    • 7.2.A. If your Internet Service Provider (ISP) blocks Tor relays in your area, click ‘Yes’ when prompted to access local unlisted relays.
    • 7.2.B. You can use provided bridges by selecting ‘obfs3’ from the Transport types. Press ‘Connect’.
    • 7.2.C. If those bridges are blocked, use a custom bridge. You can request bridge IP addresses at bridges.torproject.org. Copy and paste the address of the bridge(s) from the website, and press ‘Connect’.
    • 7.2.D. If bridges.torproject.org is blocked, request bridges via email. Write get bridges’ to bridges@torproject.org. You can only do this from a Gmail account. Copy the bridge address(es) from the response email into the configuration window, and press ‘Connect’.
    • 7.3.A. If you have a firewall that only lets you connect through certain ports, click ‘Yes’ when prompted. This advanced setting refers to whether you’ve configured your application firewall to exclude Tor.
    • 7.3.B. …then specify allowed port numbers in the dedicated window.
  8. Once you’re connected, Tor Browser will launch.

How to Use Tor Safely ?

Ready to start exploring? Use these additional safety features to cover your tracks online.
  1. Launch Tor Browser from your computer or flash drive. To check that Tor is running, click ‘Check Tor Network Settings’.
  2. The next page will show the IP address your ISP sees while you’re browsing with Tor. This isn’t your real IP address. You can check the geolocation of this IP at whatismyipaddress.com. The geolocation should differ from your real location.
  3. Click the onion icon for settings. Click ‘New Identity’ for Tor to generate a new virtual IP address for you.
  4. In ‘Preferences’ on the same panel, make sure the Security Setting boxes are ticked. You can adjust these settings any time.
  5. You can change your way of connecting to Tor any time in ‘Open Network Settings’, much the same way as you did at your first connection. You can add proxies, switch to bridges, etc.
  6. Tor Browser will alert you to tracking attempts – you can manage these as they pop up.
  7. In the top-right corner, enable ‘HTTPS Everywhere’, which protects against click-jacking applications that could steal your login data. Note: this only works on websites that support HTTPS.
  8. You can block JavaScripts, Java Flash and other plugins with NoScript. The S button next to the onion icon will be crossed out if script blocking is active.
If you trust a page, allow scripts manually by clicking on the button (or right-clicking on the page) and choosing ‘temporarily allow’.
Happy Browsing !!!
Though total online privacy is nowadays seen as an impossible myth, Tor can be powerful tool in protecting your online identity..
You Can Also Use Tor on Your Android Device : Tor For Android

Sources :

and if you like this post please like & share with your friends...
& Don't Forget To....
Like Our Facebook Page : www.facebook.com/thehackingsage
Join Our Facebook Group : www.facebook.com/groups/thehackingsage
Follow Us at Twitter : www.twitter.com/thehackingsage
Follow Us at Instagram : www.instagram.com/thehackingsage
Subscribe Our You Tube Channel : www.youtube.com/c/THEHACKiNGSAGE4U
Keep Visiting... Enjoy !!! :)

Labels: , , , , , , , , ,

Tor for Android (Orbot & Orfox) APK

Orbot - THE HACKiNG SAGE Orfox - THE HACKiNG SAGE
Orbot & Orfox

If Don't Know What Is Tor ? Click Here -->> Tor For Newbies - How & Why To Use It?

Orbot is a free proxy app that empowers other apps to use the internet more securely. Orbot uses Tor to encrypt your Internet traffic and then hides it by bouncing through a series of computers around the world. Tor is free software and an open network that helps you defend against a form of network surveillance that threatens personal freedom and privacy, confidential business activities and relationships, and state security known as traffic analysis.

Orfox is built from the same source code as Tor Browser (which is built upon Firefox), but with a few minor modifications to the privacy enhancing features to make them compatible with Firefox for Android and the Android operating system.

Orfox REQUIRES Orbot app for Android to connect to the Tor network.

Orbot: Proxy with Tor - THE HACKiNG SAGE Orfox: Tor Browser - THE HACKiNG SAGE

Download Orbot: Proxy with Tor : PlayStore

Download Orfox: Tor Browser : PlayStore

Enjoy!!! :)

Labels: , , , , , ,

Saturday, 12 November 2016

Kali-NetHunter - Turn Your Android Phone into a Hacking Machine

Kali-NetHunter - Turn Your Android Phone into a Hacking Machine - THE HACKiNG SAGE

The Kali Linux NetHunter project is the first Open Source Android Penetration Testing platform for Nexus devices, created as a joint effort between the Kali community member “BinkyBear” and Offensive Security. NetHunter supports Wireless 802.11 frame injection, one-click MANA Evil Access Point setups, HID keyboard (Teensy like attacks), as well as BadUSB MITM attacks – and is built upon the sturdy shoulders of the Kali Linux distribution and toolsets. Whether you have a Nexus 5, Nexus 6, Nexus 7, Nexus 9, Nexus 10 or OnePlus One we’ve got you covered. freely downloadable images come with easy to follow installation and setup instructions to get you up and running in no time at all.

Kali-NetHunter - Nexus - THE HACKiNG SAGE
  • 802.11 Wireless Injection and AP mode support with multiple supported USB wifi cards.
  • Capable of running USB HID Keyboard attacks, much like the Teensy device is able to do.
  • Supports BadUSB MITM attacks. Plug in your Nethunter to a victim PC, and have your traffic relayed though it.
  • Contains a full Kali Linux toolset, with many tools available via a simple menu system.
  • USB Y-cable support in the Nethunter kernel – use your OTG cable while still charging your Nexus device!
  • Software Defined Radio support. Use Kali Nethunter with your HackRF to explore the wireless radio space.
As an experienced penetration tester or security professional, it is imperative that you trust the tools you work with. One way to achieve this trust is by having full transparency and familiarity with the code you are running. You are free to read, investigate, and change the build scripts for the NetHunter images. All of this goodness from the house of Offensive Security and developers of Kali Linux!

HID Keyboard and ‘BadUSB’ Attacks

NetHunter images support programmable HID keyboard attacks, (a-la-teensy), as well as “BadUSB” network attacks, allowing an attacker to easily MITM an unsuspecting target by simply connecting their device to a computer USB port. In addition to these built in features, we’ve got a whole set of native Kali Linux tools available for use, many of which are configurable through a simple web interface.

Configuration Management

The Kali NetHunter configuration interface allows you to easily configure complex configuration files through a local web interface. This feature, together with a custom kernel that supports 802.11 wireless injection and preconfigured connect back VPN services, make the NetHunter a formidable network security tool or discrete drop box – with Kali Linux at the tip of your fingers wherever you are!

How To Install ?

1- First Of All You Need A Rooted Nexus/OnePlus One Device With TWRP Recovery,

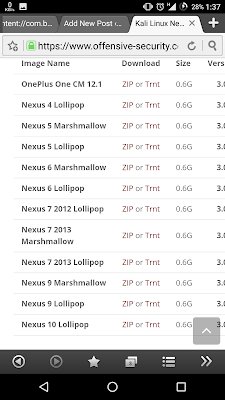
2- Download Kali-NetHunter For Your Device,

Image Name
Download
Size
Version
OnePlus One CM 12.1
0.6G
3.0
Nexus 4 Lollipop
0.6G
3.0
Nexus 5 Marshmallow
0.6G
3.0
Nexus 5 Lollipop
0.6G
3.0
Nexus 6 Marshmallow
0.6G
3.0
Nexus 6 Lollipop
0.6G
3.0
Nexus 7 2012 Lollipop
0.6G
3.0
Nexus 7 2013 Marshmallow
0.6G
3.0
Nexus 7 2013 Lollipop
0.6G
3.0
Nexus 9 Marshmallow
0.6G
3.0
Nexus 9 Lollipop
0.6G
3.0
Nexus 10 Lollipop
0.6G
3.0

3- Move the zip file to your root folder on your android device,

4- Reboot in Recovery,

5- Select the zip folder and flash your system,

6- Let this run for about 15-30 min..

If successful, you have successfully installed Kali Linux with Net Hunter install..


Note: Offensive Security does not provide technical support for NetHunter. Support for NetHunter can be obtained via various methods listed on the Kali Linux Community page. Further documentation can be found at NetHunter Github Wiki.

Wait ....   No Nexus ??? No OnePlus One ??? Using Any Other Android Device ???

Here's How To Install Kali NetHunter On Any Android Device :

1. Download Kali-NetHunter.zip,

Install Kali NetHunter On Any Android Device - THE HACKiNG SAGE

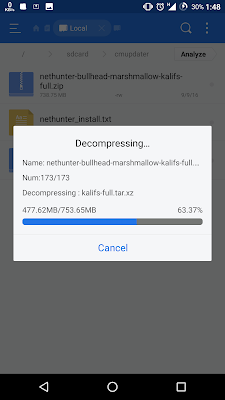
2. After you download it. you will get the file [nethunter-bullhead-marshmallow-kalifs-full.zip],

Install Kali NetHunter On Any Android Device - THE HACKiNG SAGE

3. Extract it,

Install Kali NetHunter On Any Android Device - THE HACKiNG SAGE

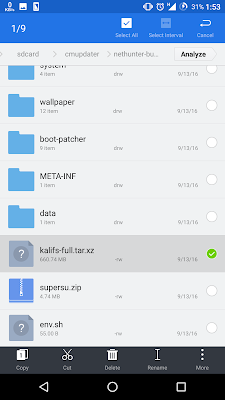
4. From the extracted folder, search for [kalifs-full.tar.xz] file, and move it to /sdcard

Install Kali NetHunter On Any Android Device - THE HACKiNG SAGE

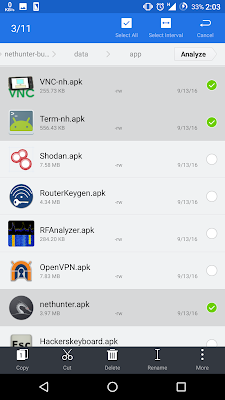
5. From the extracted folder install [nethunter.apk Term-nh.apk VNC-nh.apk] from data/app.

Install Kali NetHunter On Any Android Device - THE HACKiNG SAGE

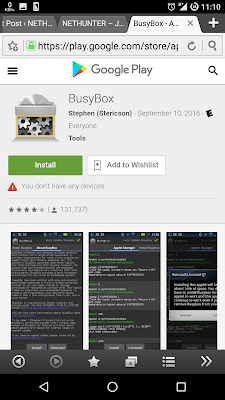
6. Download [busybox.apk] and install it.

Install Kali NetHunter On Any Android Device - THE HACKiNG SAGE

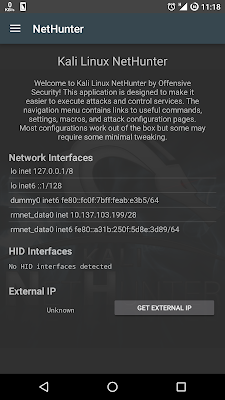
7. Open nethunter app and allow the permissions.

Install Kali NetHunter On Any Android Device - THE HACKiNG SAGE

8. Open NetHunter-Terminal and choose ANDROIDSU then type the following commands :

Install Kali NetHunter On Any Android Device - THE HACKiNG SAGE

mount -o remount,rw /system

ln -s /data/data/com.offsec.nethunter/files/scripts/bootkali system/bin/bootkali

ln -s /data/data/com.offsec.nethunter/files/scripts/bootkali_login system/bin/bootkali_login

ln -s /data/data/com.offsec.nethunter/files/scripts/bootkali_bash system/bin/bootkali_bash

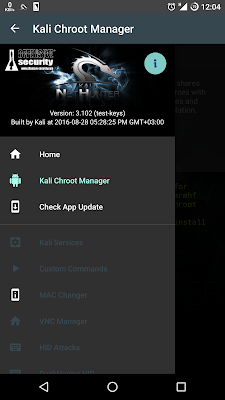
9. Open nethunter and press on Kali Chroot Manager.

Install Kali NetHunter On Any Android Device - THE HACKiNG SAGE

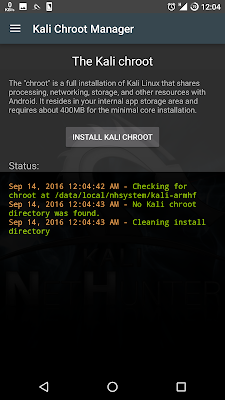
10. Choose INSTALL KALI CHROOT

Install Kali NetHunter On Any Android Device - THE HACKiNG SAGE

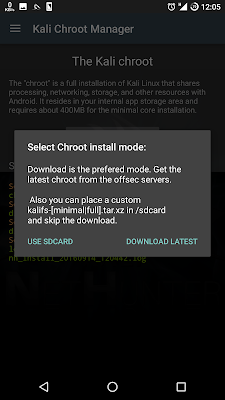
11. Choose USE SDCARD

Install Kali NetHunter On Any Android Device - THE HACKiNG SAGE

12. Choose FULL CHROOT

Install Kali NetHunter On Any Android Device - THE HACKiNG SAGE

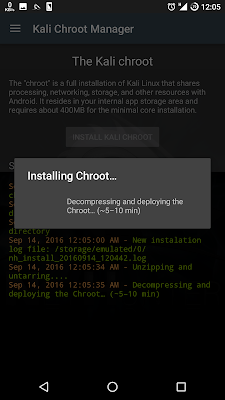
13. Installing Chroot may be take 10 minute to be completed.

Install Kali NetHunter On Any Android Device - THE HACKiNG SAGE

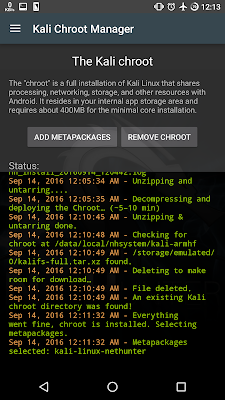
14. After complete, the file [kalifs-full.tar.xz] will be deleted.

Install Kali NetHunter On Any Android Device - THE HACKiNG SAGE

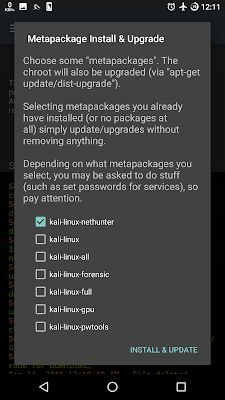
15. You can select any metapackages you want to install or ignore it.

Install Kali NetHunter On Any Android Device - THE HACKiNG SAGE

Done !!! :)

Enjoy & Remember BE ETHICAL.

Looking for the Virtual Images of Kali Linux Penetration Testing Distribution? 


Download Kali Linux VMware and VirtualBox Images : Click Here


and if you like this post please like & share with your friends...

& Don't Forget To....

Like Our Facebook Page : www.facebook.com/thehackingsage

Join Our Facebook Group : www.facebook.com/groups/thehackingsage

Follow Us at Twitter : www.twitter.com/thehackingsage

Follow Us at Instagram : www.instagram.com/thehackingsage

Subscribe Our You Tube Channel : www.youtube.com/c/THEHACKiNGSAGE4U

Keep Visiting... Enjoy !!! :)
Labels: , , , , , , , , , ,